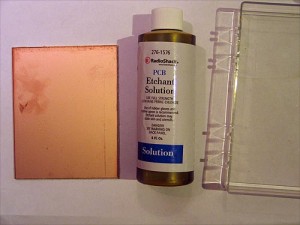
Not sure how many (if any) of you may ever need to do this...
but if you want to mount those sensors we got or accent leds..(or anything) to a little custom PCB for your projects..
you can make a PCB all by yourself with nothing more than a black-n-white laser printer, the copper pcb board, and some etchant solution
Etchant Solution:
http://www.radioshack.com/product/index ... Id=2102868
I think they stopped making them..but some stores still have old inventory.. (I got my last 2 kits for $3+ each)
# 276-1576 is the KIT# (read the description, and you'll see reference to the kit)
comes with:
etchant solution
tray(s)
etchant/ink remover solution
copper PCB board (2 thicknesses)
drill bit
scotch brite pad
permanent ink marker
you really only need the etchant and the copper pcb board.

I made a little layout/schematic (nothing special)
in photoshop.. @ 300 DPI

** make sure you print on glossy PHOTOPAPER.. this works best in my tests..
print out your schematic..
cut out schematic
iron schematic to the copper pcb board... let it sit a bit.. make sure transfer is nice.
under cold water.. 'wash away' the photo paper on the PCB board.. it will leave behind the INK/TONER from the paper on the PCB..
(I didnt take a pic of this....sorry)
but it would be like you printed ON the PCB (more or less) after you wash away the photo paper with water.
fill tray up with etchant solution..
throw section of pcb board with print out ironed on it..into tray..
(etchant will eat away/remove ALL copper 'except' where the ink/toner was left at)
once all copper is gone..and only black ink/toner is left on board...
you can take high grit sand paper or the scotch brite pad..and clean off the toner that was left on the board.. revealing the copper (now traces) on the board..

It can be used to get some fairly decent lines and things are very crisp for what it is..
I made a 'pcb' board to hold my X & Y axis swing sensors....and my clash sensor.. and soldered solid core wires that fit into my bread board to test with the RFX project..

Ive also used this method to make a few LED driver boards to drive a LUXIII/P4 w/PWM support... as well as a 3 & 4 driver board for RGB or RGBA diode LEDS..
I made these printing on WAX paper though..and the transfer isnt as good after ironing as using glossy photo paper and washing it away under water after ironing.
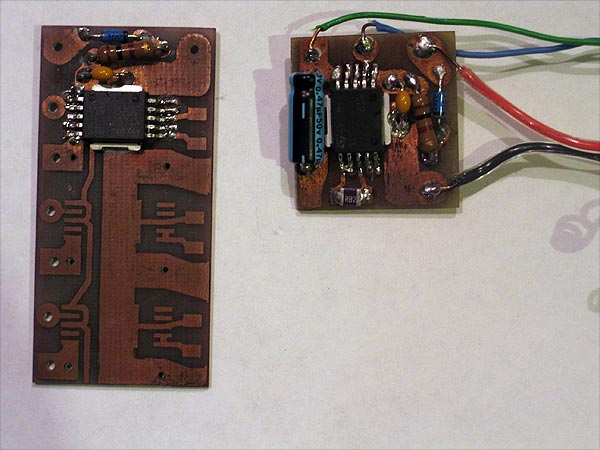
and these are just HOME BODY, DIY needs..and they work a treat..
image how small things could be if they were professional designed and manufactured!! PHOOK!>.lol
hope this helps any of the DIY builders out there..:)
-----------------------------------------------------------------------------------------
For these tests...
I have used a very affordable HP LaserJet 1022n (n = networked)/
basic stock black-n-white laser printer.
as for photo paper.. I have success with several brands, sizes & type.. glossy or semi-gloss all types were..
all transfer CLEAN, SOLID lines..vs. using a wax paper or a mailing label backing or similar..
I was very impressed with the quality of transfer using photo paper vs. anything else.
re: etchant.. a few other things to note..
myself. (wrong or right).. I keep my solution in a plastic tub/container.. (with lid)..and just leave it.).. I re-use it.. sometimes adding more or etchant at times..
also adding air/bubbles to the solution helps speed up the process and works well...
my point/goal was to provide a method that doesnt require any special ordering of materials or supplies.. everything should be able to be purchased locally...for cheap!
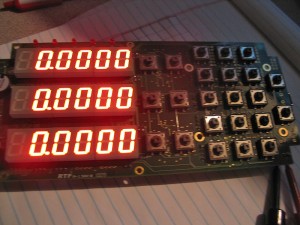
Shumatech DRO 500 DIY:
Link: http://www.shumatech.com/web/products/dro-550/power-buy
http://shumatech.com
SHUMATECH DRO-550 PROJECT: [PARTS LIST]
$75.00 (may go down... this is w/o taxes & paypal)
Shumatec DRO-550
http://www.shumatech.com/web/products/dro-550/power-buy
DRO-550 Board (itself)
*all surface mount components pre-soldered
* extra's (below) are what needs to be soldered, (through hole/easy components)
$16.19 (extras)
http://www.shumatech.com/web/products/dro-550/power-buy
9 RED 7-segment LEDs $7.47
5 RED 3mm indicator LEDs $0.77
23 Keypad tact switches $4.14
23 Black tact switch caps $1.84
1 Program tact switch $0.17
2 2-pin MTA headers $0.13
5 3-pin MTA headers $0.44
5 4-pin MTA headers $0.58
5 2x2 Header $0.35
5 Shunt jumper $0.30
Parts needed to complete DRO-550 kit/build: (outside from above parts)
DRO-550 Specific:
$11.25
Hammond 1599HBK Unmachined Case:
http://www.wildhorse-innovations.com/in ... oductId=90
$17.99
DRO-550 Internal Cable Kit:
http://www.wildhorse-innovations.com/in ... oductId=89
$19.99 x 1
DRO-550 (speciic) Case - Machined:
http://www.wildhorse-innovations.com/in ... oductId=88
$14.99 x 1
DRO-350 Faceplate
http://www.wildhorse-innovations.com/in ... roductId=6
$1.75 x ??
Mini-Din Plug
http://www.wildhorse-innovations.com/in ... oductId=24
$12.99 x 1
AC Adapter - 9vdc @ 1.2a
http://www.wildhorse-innovations.com/in ... roductId=7
If you want to be 'ahead' of the game.. maybe contact
www.wildhorse-innovations.com
(I did) and they told me they were going to stock DRO-550 specific stuff this week..
just checked for ya..
cases, internal cables..DRO-550 specific..
for you.. you may want the un-machined cases..and do them yourself to fit whatever specs you want/like?
unmachined:
http://www.wildhorse-innovations.com/in ... oductId=90
DRO-550 internal cables:
http://www.wildhorse-innovations.com/in ... oductId=89
DRO-550 specific machined case:
http://www.wildhorse-innovations.com/in ... oductId=88
update on FINAL costs:
Fixed Costs
Item Estimated Cost
NRE (Stencils, SMT programming, PCB tooling) $1,785.00
Setup (Manufacturing setup) $342.00
Prototypes (2 development prototypes) $525.96
Subtotal
$2,652.96
Recurring Costs
Item Estimated Cost
Material (Raw parts costs) $47.42
Labor (Human labor costs) $30.08
Subtotal
$77.50
Extra Component Costs
Quantity Component
Estimated Cost
9 RED 7-segment LEDs $7.56
5 RED 3mm indicator LEDs $0.25
1 Piezo Buzzer $1.28
23 Black tact switch caps $1.61
1 Program tact switch $0.33
2 2-pin MTA headers $0.08
5 3-pin MTA headers $0.30
5 4-pin MTA headers $0.40
5 2x2 Header $0.85
5 Shunt jumper $0.25
Distributor Shipping + Kitting Supplies (TBD) $2.00
Total
$14.91
Per-Board Costs (With Extra Components)
Item Estimated Cost
Fixed $4.82
Recurring $77.50
Extra Components $14.91
PayPal (3.9% + 2 x $0.30) $4.58
Total
$101.82
Per-Board Costs (Without Extra Components)
Item Estimated Cost
Fixed $4.82
Recurring $77.50
PayPal (3.9% + 2 x $0.30) $3.97
Total
$86.29
----------------------------------------------------------------
Adding some links and what not that we can use to refer back on when we get these things..
I want to be able to use this to its FULL potential..
I think once I get my mill..the bolt hole pattern feature will be a featured used quite often by me.
some of links will be to DRO-350 stuff.. user guides..etc.. because I feel useful info will still be there..
also some of these are un-official guides NOT form the developer (but were highly recommended)
I think the Users Guide of the DPU-550 will be the closest for what is in the DRO-550...Users Guide (which is coming any day now)
Rick Sparber: (unofficial docs)
http://rick.sparber.org/sh.htm
Shumatec: DRO-550 Hardware Manual
http://groups.yahoo.com/group/ShumaTech ... Manual.pdf
DRO-350 Users Guide: The official DRO-350 User's Guide for software release 4
http://www.shumatech.com/products/dro-3 ... /guide.pdf
DPU-550 User's Guide: Daughter board to DRO-350
http://www.shumatech.com/products/dpu-5 ... RO-550.pdf
Chinese Scales:
A technical descrition of the Chinese scale protocol and their operation.
http://www.shumatech.com/support/chinese_scales.htm
The Chinese Scale Experience
Bill Havins, a user of the ShumaTech DRO-350, wrote a great article on his experiences using Chinese scales. The artice covers where to purchase Chinese scales, their installation on equipment, and general troubleshooting.
http://www.shumatech.com/support/Chines ... rience.pdf
OPEN DRO Project:
http://opendro.sourceforge.net/
a nice feature/add-on was posted about using the two extra axis for a min LCD screen..
looks trick..
http://www.shumatech.com/web/products/lcd-200
----------------------------------------------
ok boys...
I know Alan, Erv & Goodman all got these DRO's (or are coming soon)..
they overlays on the shumatech sites are available now..as wella sthe LCD add-on kit (and overlay for that as well)
that being said.. I gave it a shot at making my own overlay..
and Im releasing it here for anyone lse that may want to use it.. or in fact edit it..as I am including the source .psd file as well.
Also included in the .psd is the BASE TEMPLATE for the enclosure milling specs (where the cut outs are)
alternately.. if anyone wants something custom done.. just let me know.. (ie: diamond plate background...... or you companies name in the corner.. different color scheme.......whatever)
this first version was me trying to be minimal and clean..
it is based off of my first 'mock-idea' (and is almost identical)
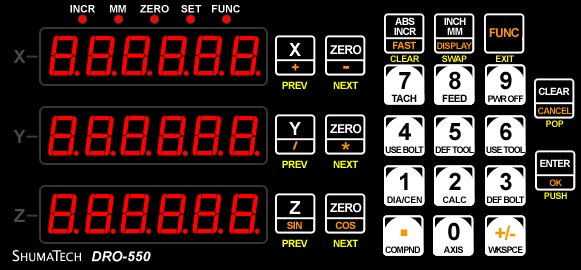
hope you guys like it.. (working a backlit idea/version currently)
http://dmstudios.net/misc/DRO-550/DRO-5 ... inimal.zip
-------------------------------------------------------------------------------------------------
my DRO-550 arrived..packed nice..and no problems so far..
still need to order my case/enclosure..internal cables..etc..
but the MAIN portion is here (I got two of them)
the 'kit' pic: (sorry its blurry)

top:

bottom:

man..getting those SMD components installed for us..and the buttons too for an extra $4 was WELL worth it..LOL
there are some polls up for some of the overlays..and some other questions (if you guys are interested)
I think by default..they come with RED numeric displays... anyone changing to green? (they look sharp).. or another color? I have been able to find a BLUE in the same package/footprint as the one for the DRO-550 uses.
figured Id post with the first update..Im curious to watch and discuss others builds too..
-------------------------------------------------------------------------------------------------------------------------
took some time last night.. to finally look into things more..
Im excited..and this 'project' looks very fun.
I have gathered the files needed for everyone else..
here are the links as well (which I recommend..they step by step walk you trough set-up)..
Construction:
http://www.shumatech.com/web/products/d ... nstruction
PDF:
http://groups.yahoo.com/group/ShumaTech ... 0Guide.pdf
Software:
http://www.shumatech.com/web/products/dro-550/software
PDF:
http://groups.yahoo.com/group/ShumaTech ... 0Guide.pdf
Hardware:
http://www.shumatech.com/web/products/dro-550/hardware
PDF:
http://groups.yahoo.com/group/ShumaTech ... Manual.pdf
OpenDRO Software:
http://sourceforge.net/projects/opendro/files/
SAM-BA:
http://www.atmel.com/dyn/resources/prod ... 0v1.13.exe
(Im also really diggin' this LCD add on for the other extra functions/axis..etc)
http://www.shumatech.com/web/products/lcd-200
I took out 1 of my boards last night.. grabbed the "Construction Manual" (linked to above)
had done all prelim tests
(measured resistance at certain spots)
soldered in ALL headers & tact switch
hooked it up to my PSU using 9V @ 1.5A
metered certain points to check 5v, 3.3v, 1.5v, 1.8v, etc (all was perfect)
hooked up to USB port.. installed drivers to recognize chip/board
installed SAM-BA (linked to above)
flash Atmel chip
verified write
(everything was perfect)
I did all of this in about 30 minutes or.. I glanced over the documentation while cleaning up after dinner. knew what I needed.. (already had files downloaded & documentation printed out in binder as well)..
and that was that.
Im 'very' happy with not only the quality, but documentation as well.
This is EASY!!!!
I have NOT installed my display LED's for two reasons:
1.) I do not have an enclosure yet.. and I want to make sure I mount them to be flush and display/light well behind the overlay.
2.) Im not 100% sure I sticking with the ALL RED display LEDS..
(I have been looking for some BLUE one....anybody?)
but may get all green.. or even multi-color.
(ie: 1 color for each axis, X-red, Y-green, Z-amber)
also we can make our own custom overlays as well..the group has been having polls on tons of different versions..
I'll try and post some more pics..
-----------------------------------------------------------------------------------------------------------
I still have NOT ordered my case and internal cable kits..etc (nor scale plugs or power adapter)
anyways here are some pics.. the basic construction will take less than 1 hour.. (less on second units) people who posted it 'only' taking them 3 hours... I was thinking thats not too bad... but now Im like..what the fuck were they doing?
nothing but a ton of headers with through holes to solder to.
check out my soldering.. (not too bad) 

all the headers (overview)

there she is:

and lit-up:
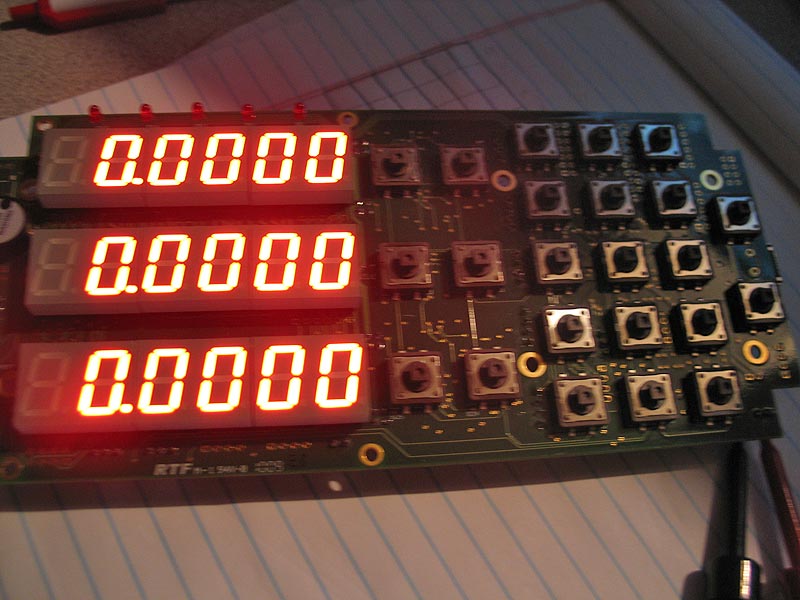
man there is 162 solder 'joints' to do on the 9 x 7-segment led displays!! plus all the headers! hahaha
here was my submission to the overlay poll/post
can buy order one of the new ones... or make your own at a kinkos or whatever if you want custom color scheme or whatever.. there was some nice ones posted too
-----------------------------------------------------
All completed.. (the first one at least)..
the second is all soldered up..just need to assemble case and attach internal cables!
Im digging it so far!
Im making my own overlays..so if anyone wants to file(s)..let me know.
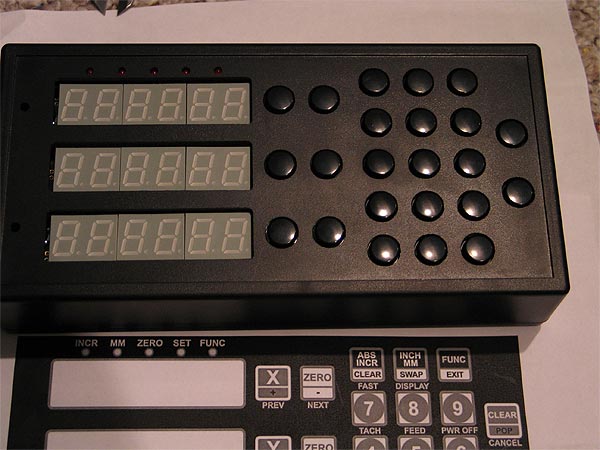
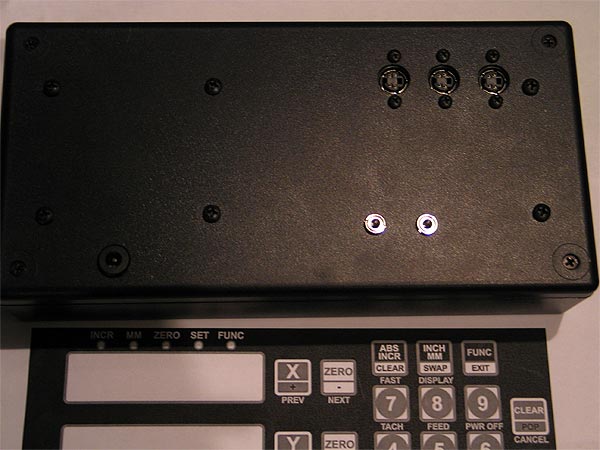
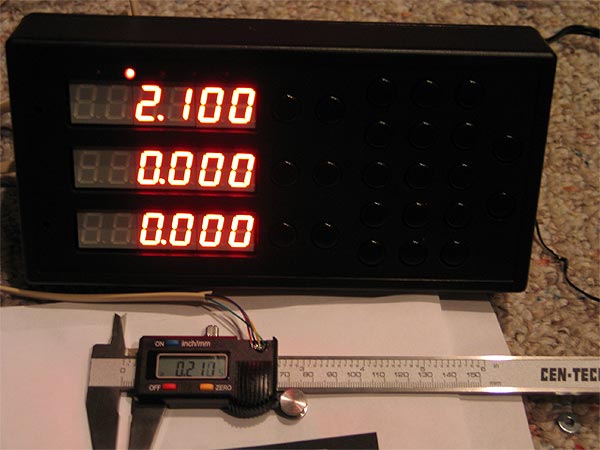
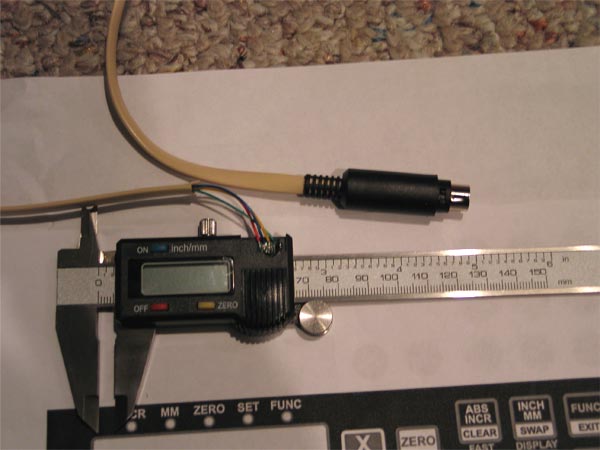
test scale I made..using $9.99 HF caliper...
the first overlay Im finishing up.. (all 300 DPI .jpg's..with included source .psd file)


ezPreloader Component v2.0 ezPreloader v2.0 Documentation
Documentation:
Welcome to the ezPreloader_v2.0 component.
A light weight, easy to use, full customizable preloader component.
This component makes use of the MovieClipLoader(): class, and along with letting you set a number of physical parameters (to control its look), you can also define the content you want to load (loadSource) and where you want to load it (loadTarget).
Those are basically the only two parameters that are REQUIRED for the component to work. The rest are optional
Because this component uses the MovieClipLoader(); class, it also allows us to make use of the listener/callBack functions. This is great for basing other actions or functions depending on the current state of the content being downloaded. The returned data from these callBacks helps power the ezPreloader_v2.0 conponent and is also passed onto any custom callback functions you may want to register and ustilize the same data.
go into more details below.
User Controlled Component Properties:
Code:
PROPERTY:        VARIABLE NAME:                DESC:

REQUIRED:

Load Source        (Property Var: loadSource:String)    Defines the content (.swf/image/video) to load

Load Target        (Property Var: loadTagret:String)    Defines the target (containerClip/_level) to load into

OPTIONAL:

Height           (Property var= uHeight:Number)        Controls the height of the rotation/animation

Width            (Property var= uWidth:Number)        Controls the width of the rotation/animation

Rotation Speed        (Property var= uSpeed:Number)        Controls the speed of the rotation/animation

Rotation Visible     (Property var= uVisible:Boolean)    Controls the visibility of the rotation/animation

Color Choice        (Property var= uColor:Color)        Defines the color of the rotation/animation

Rotation Alpha        (Property var= uAlpha:Number)        Defines the alpha of the rotation/animation

Text Color           (Property Var= tColor:Color)        Defines the color of the percentage text

Text Alpha        (Property Var= tAlpha:Number)        Defines the alpha of the percentage text

Text Size        (Property Var= tSize:Number)        Defines the size of the percentage text

Text Visible        (Property Var= tVisible:Boolean)    Controls the visibility of the percentage text

CallBack Register Vars (and returned parameters)

completeCallback:String =   >>Returns: (targetMc:MovieClip, httpStatus:Number)

errorCallback:String =      >>Returns: (targetMc:MovieClip, errorCode:String, httpStatus:Number)

initCallback:String =       >>Returns: (targetMc:MovieClip)

progressCallback:String =   >>Returns: (targetMc:MovieClip, loadedBytes:Number, totalBytes)

startCallback:String =      >>Returns: (targetMc:MovieClip)

Function Name:                            Desc:

startLoad(loadSource, loadTarget);                Start the load of the loadSource into the loadTarget
Summary of usage:
Ther are basically three ways the ezPreloader_v2.0 preloader can be used.
The first two involves dragging the component to stage in the authoring environment.
(Article assumes you have already successfully installed the ezPreloader_v2.0 component and it resides in your Flash IDE in the compoenents panel under the ezConponents folder)
1.)(auto load/manual settings) The component is draged on the stage from the component panel onto the stage. Once the component is on the stage, you select/highlight it, and go to the properties panel and under the parameters tab you can set the options to match your project. The only properites that need to be set as the loadSource & loadTarget parameters. Once the component is on stage (and these parameters are filled with valid values) it will automatically start the load when your movie starts.
2.)(manual load/manual settings) The component is draged on the stage from the component panel onto the stage. Once the component is on the stage, you select/highlight it, and go to the properties panel and under the parameters tab you can set the options to match your project. For this method (or not to automatically start loading your content when the movie starts) you should leave the loadSource & loadTarget parameters as alone or blank. You must also remember to give your component an INSTANCE NAME, so you can trigger the load action from another event (button click or something). The component has a public function call startLoad();. This function also accepts two parameters that are required.
startLoad(loadSource, loadTarget);
Those parameters are:
loadSource: (which is the content you want to load)
loadTarget: (which is the target you want to load your content into)
If you didnt want to set any of the physical attribute parameters.. the minimal steps for using method #2 would be as follows:
Code example: (assuming component is on stage with INSTANCE NAME of: ezPreloader)
AS Code:
Code:
//create empty clip to load content into

var containerClip:MovieClip = _root.createEmptyMovieClip("containerClip", _root.getNextHighestDepth());
button_btn.onPress = function(){
//load code for manually placed components
ezPreloader.startLoad("imagename.jpg", containerClip);
}
3.)(manual load/dynamic setting) the 3rd & final method I see the that can be used is attching the component dynamically like most other movieClip/component are. You follow the same rules/code you would use to attach any other clip to the stage and assign properties to it once it initializes. This means that not only do you have to set all physical atributes through code, but you must also set the REQUIRED parameters: loadSource & loadTarget.
NOTE: If you assign the REQUIRED parameters: loadSource & loadTarget upon attaching/initializing of the clip.. it will start to load content automatically (3a). If you do not assign the required parameter a values upon attachign the clip, you have to invoke the loading manually through another action with the startLoad(); function. (3b)
Code example: (assuming component is on stage with INSTANCE NAME of: ezPreloader)
3a.)dynamic autoload
AS Code:
Code:
var attachLoader = _root.attachMovie("ezPreloader_v2.0", "ezPreloader", _root.getNextHighestDepth())

//place ezPreloader_v2.0
attachLoader._x = 150;
attachLoader._y = 100;
//animation details
attachLoader.uWidth = 33;
attachLoader.uHeight = 33;
attachLoader.uSpeed = 10;
attachLoader.uColor = 0x66CCFF;
attachLoader.uAlpha = 100;
attachLoader.uVisible = true;
//text detail
attachLoader.tColor = 0x66CCFF;
attachLoader.tAlpha = 80;
attachLoader.tVisible = true;
attachLoader.tSize = 15;
//start auto load
attachLoader.loadSource = "colorstest1.jpg";
attachLoader.loadTarget = "containerClip";
//register custom callBack functions
attachLoader.initCallback = "onInit";
attachLoader.startCallback = "onStart";
attachLoader.progressCallback = "onProgress";
attachLoader.completeCallback = "onComplete";
attachLoader.errorCallback = "onError";
3b.)dynamic manual load
AS Code:
Code:
var attachLoader = _root.attachMovie("ezPreloader_v2.0", "ezPreloader", _root.getNextHighestDepth());
//place ezPreloader_v2.0
attachLoader._x = 150;
attachLoader._y = 100;
//animation details
attachLoader.uWidth = 33;
attachLoader.uHeight = 33;
attachLoader.uSpeed = 10;
attachLoader.uColor = 0x66CCFF;
attachLoader.uAlpha = 100;
attachLoader.uVisible = true;
//text detail
attachLoader.tColor = 0x66CCFF;
attachLoader.tAlpha = 80;
attachLoader.tVisible = true;
attachLoader.tSize = 15;
//register custom callBack functions
attachLoader.initCallback = "onInit";
attachLoader.startCallback = "onStart";
attachLoader.progressCallback = "onProgress";
attachLoader.completeCallback = "onComplete";
attachLoader.errorCallback = "onError";
button_btn.onPress = function(){
//load code for manually placed components
ezPreloader.startLoad("colorstest1.jpg", containerClip1);
}
Custom CallBack FunctionS:
Every ezPreloader_v2.0 component has 5 callBack vars that you can use to register your OWN functions that get executed/triggered. when you list a function to use as that callbacks registered function, it also gets passed certain parameters that you can take advantage of and use in yoru callBack functions. (above is the chart that lists what callback function pass what parameters.
Here is an example of how to make you own functions and use the data passed in as parameters. (function names have to match the vars you give the callBack vars.
AS Code:
Code:
//create callBack functions:
// create function that fires/executes when the content is loading
function onProgress(target_mc:MovieClip, bytesLoaded:Number, bytesTotal:Number):Void {
trace(target_mc._name + ".onLoadProgress with " + bytesLoaded + " bytes of " + bytesTotal);
trace(">> Invoked every time the loading content is written to the hard disk during the loading process (that is, between MovieClipLoader.onLoadStart and MovieClipLoader.onLoadComplete).");
}
// create function that fires/executes when the content is complete
function onComplete(target_mc:MovieClip, httpStatus:Number):Void {
trace(">> targetListener.onLoadComplete()");
trace(">> =============================");
trace(">> "+target_mc._name+"._width: " + target_mc._width);
trace(newline);
};
// create function that fires/executes when the content has initialized and is ready for manipulation
function onInit(target_mc:MovieClip):Void {
trace(">> targetListener.onLoadInit()");
trace(">> =============================");
trace(">> "+target_mc._name+"._width: " + target_mc._width);
trace(newline);
};
function onStart(targetMc:MovieClip):Void {
trace(">> targetListener.onLoadStart() fired");
trace(">> =============================");
trace(newline);
};
function onError(targetMc:MovieClip, errorCode:String, httpStatus:Number):Void {
trace(">> targetListener.onLoadError() fired");
trace(">> =============================");
trace(newline);
};
If those 3 methods above are still confusing, may this will help clarify:
"If the REQUIRED variables/properties: loadSource & loadTarget are given values when the clip is initialized (whether you dynamically attach or place on stage in the IDE) the clipLoader will automatically begin your load routine.
This should about wrap up the documentation on to use the ezPreloader_v2.0 conponent. I hope you enjoy it and find it easy to use.
If you have any questions, comments or sugestion on how to make the ezPreloader_v2.0 component better please drop me a line.
ezPreloader v2.0 Component
I am posting my ezWeather desktop widget I wrote.
this is an ON-LINE version.. (as not to waste bandwidth on people dl'ing the .exe just for feedback)
Preview:


http://www.dmstudios.net/demos/ezWeather/ezWeather_v1.0_web.html
ezWeather, will be compiled to an .exe for distribution (fun), it is XML based and uses the Yahoo! Weather services rss/xlm feed.
USA zip codes only (sorry)
I think it checks for weather updates every 30 minutes or so..(I dont recall off hand!) lol
(RIGHT CLICK & DRAG will let you move/position the widget when in .exe)
(ESC key kills/closes app... in .exe)
Download the real widget here:
http://dmstudios.net/demos/ezWeather/ezWeather_v2.0.zip
(this cannot be used in any personal website or personal use without EXPRESS permission from myself in ANY CASE) I am posting here for feedback only).. if you require its use.. you MUST ask first..there may be a licensing fee.
feedback appreciated.

This is the ezSportz (widget) wrote using the Yahoo! Sports RSS feeds, I have a few buddies who like sports a lot so this was a good exercise for me..
Preview:
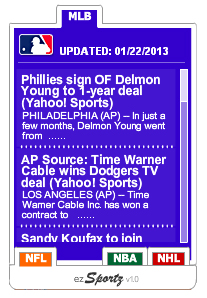
Also has auto adjusting text fields and 'attached' clips. I also limited the desc. text to the first 50 characters.. but can be extended to show or whatever length
this is an ON-LINE version.. (as not to waste bandwidth on people dl'ing the .exe just for feedback)
Preview:
http://www.dmstudios.net/demos/ezSportz/ezSportz_v1.2a_web.html
grabs all the lates YAHOO SPORTS news titles... and links to the full story upon clicking a 'news title'
ezSPORTS logo in bottom bar refreshes all news feeds...
Download REAL Desktop Widget here:
http://dmstudios.net/demos/ezSportz/ezSportz_v1.2.zip
feedback is appreciated.
thanks
UPDATE:
due to YAHOO! changing their RSS feed format.. the ezSports widget will sometimes retun UNDEFINED for some sports articles. Yahoo seems to RANDOMLY either include or not include extra META data in the XML to attach an image or other garbage (in front of all other 'static' data) (rolleyes)
I have corrected this somewhat, (thanks to silentweed at www.flashkit.com forum for turning me onto xPath for XML) but the CDATA still has GARBAGE data in it.. update coming soon.
UPDATE II:
after a quick function to find/split/replace my value.. the ezSportz widget is completely back in action. please down load it again (if you liked it in the first place) 
Welcome to the ezTextScroller component.
http://www.dmstudios.net/demos/ezTextScroller/ezTextScroller_v1.0.zip (also at Adobe Exchange- keyword: ezTextScroller)
Desc:
This component will give you the ability to scroll the contents on any given TEXT FIELD, weather it be text, XML or embeded media. You will also have complete control over the color, height/width & alpha fo the scrollBar.
Overview:
it is very easy to use. You drag a component to the stage, and you 'assign' it a textField to scroll. Anything that gets loaded into this text field will be scrolled. ezTextScroller, will automatically scroll to the max height (length) of its assigned text field.
Once you have your component instance on the stage, make sure to give it an INSTANCE NAME. By selecting the ezTextScroller instance, you can then go the PARAMETERS panel in the PROPERTY INSPECTOR and assign the custom values for you component.
PARAMETERS:
1.) field2Scroll: the instance name fo the textField to be scrolled.
2.) scrollerHeight: visual height of the scrollBar.
3.) scrollerWidth: visual width of the scrollBar
4.) innerAlpha: alpha percentage of the inner fill color of the scrollbar
5.) outterAlpha: alpha percentage of the outline of the scrollbar
6.) innerFill_rgb: color of the inner fill of the scrollBar
7.) outLine_rgb: color of the outline of the scrollBar
(Note: If you are looking for a ezTextScroller version that also lets you choose a text file to load, please refer to the ezTextScroller&Loader component.)
Welcome to the ezPreloader component.
Desc:
This component will give you a visual representation (both through animation & percetange loaded text) on how much of your content is loaded into it's 'target clip'.
Overview:
it is very easy to use. You drag a component to the stage, and you 'assign' it a target clip (movie clip) to watch. Anything that gets loaded into this 'target clip' will trigger the ezPreloader to show and display how much left there is to load. When complete, the movieClip will disappear. Load another piece of content (image, swf or video clip) and the preloader will disappear. Load another piece of content (image, swf or video clip) and the preloader will trigger again.
Once you have your component instance on the stage, make sure to give it an INSTANCE NAME. By selecting the ezPreloader instance, you can then go the PARAMETERS panel in the PROPERTY INSPECTOR and assign the custom values for you component & movie.
PARAMETERS:
1.) loaderColor: choose a #color that you want the rotatingArrows to be.
2.) percentVisible: choose to display the percentage textField or not.
3.) percentColor: choose a #color that you want the percentage text to be.
4.) rotateSpeed: number value that depicts the speed of the rotatation.
5.) targetClip: 'path' (relative or absolute) to the movie clip you want the simplePreoader to 'watch' and give results on. (Note: the path is /home to whatever timeline the ezPreloader is in)
6.) callbackFunction: lets you declare a function name that you want executed after the 'loading' is complete. (NOTE: do NOT include the () after the funciton name)
7.) alwaysOn: lets you decide to have the 'check' (onEnterFrame) running continuously.
(Note: it is recommended to run this default in FALSE (off) mode, and manually move the playHead to frame 2 on the ezPreloader component)
TRUE MODE: Lets you ONLY do a simple 'loadMovie()' on your target..and the 'ezPreloader' will do the rest. (but leaves code running all the time and can eat up resources)
Example: (alwaysOn set to TRUE)
button1_btn.onPress = function(){

containerClip.imageHolder.loadMovie("image1.jpg");

}
FALSE MODE: (recommended) Means you have to manually advance the playhead to frame 2 in the 'ezPreloader' component, but does not leave messy or rampant code running.
Example: (alwaysOn set to FALSE)
button1_btn.onPress =function(){

containerClip.imageHolder.loadMovie("image1.jpg");

ezPreloader.gotoAndStop(2);

}
---------------------------------------------------
component can be found here:
http://www.dmstudios.net/demos/ezPreloader.zip (or on Adobe exchange - keyword: ezPreloader)
here is a link to the component in 'action' (so you can see what it looks like)
http://www.dmstudios.net/demos/customComponent/customComponent.html
here is a link to the .fla so you can see the TWO methods on how to code the buttons (very easy):
http://www.dmstudios.net/demos/customComponent/preloaderComponentTest.zip


![]()


