DIY: Homebrew PCB etching

Not sure how many (if any) of you may ever need to do this...
but if you want to mount those sensors we got or accent leds..(or anything) to a little custom PCB for your projects..
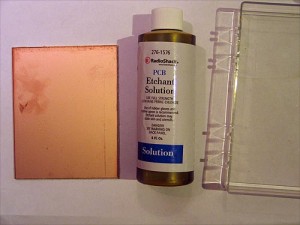
you can make a PCB all by yourself with nothing more than a black-n-white laser printer, the copper pcb board, and some etchant solution
Etchant Solution:
http://www.radioshack.com/product/index ... Id=2102868
I think they stopped making them..but some stores still have old inventory.. (I got my last 2 kits for $3+ each)
# 276-1576 is the KIT# (read the description, and you'll see reference to the kit)
comes with:
etchant solution
tray(s)
etchant/ink remover solution
copper PCB board (2 thicknesses)
drill bit
scotch brite pad
permanent ink marker
you really only need the etchant and the copper pcb board.

I made a little layout/schematic (nothing special)
in photoshop.. @ 300 DPI

** make sure you print on glossy PHOTOPAPER.. this works best in my tests..
print out your schematic..
cut out schematic
iron schematic to the copper pcb board... let it sit a bit.. make sure transfer is nice.
under cold water.. 'wash away' the photo paper on the PCB board.. it will leave behind the INK/TONER from the paper on the PCB..
(I didnt take a pic of this....sorry)
but it would be like you printed ON the PCB (more or less) after you wash away the photo paper with water.
fill tray up with etchant solution..
throw section of pcb board with print out ironed on it..into tray..
(etchant will eat away/remove ALL copper 'except' where the ink/toner was left at)
once all copper is gone..and only black ink/toner is left on board...
you can take high grit sand paper or the scotch brite pad..and clean off the toner that was left on the board.. revealing the copper (now traces) on the board..

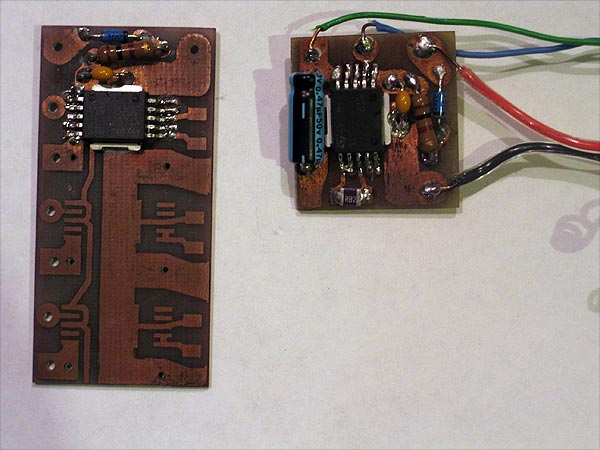
It can be used to get some fairly decent lines and things are very crisp for what it is..
I made a 'pcb' board to hold my X & Y axis swing sensors....and my clash sensor.. and soldered solid core wires that fit into my bread board to test with the RFX project..

Ive also used this method to make a few LED driver boards to drive a LUXIII/P4 w/PWM support... as well as a 3 & 4 driver board for RGB or RGBA diode LEDS..
I made these printing on WAX paper though..and the transfer isnt as good after ironing as using glossy photo paper and washing it away under water after ironing.

and these are just HOME BODY, DIY needs..and they work a treat..
image how small things could be if they were professional designed and manufactured!! PHOOK!>.lol
hope this helps any of the DIY builders out there..:)
-----------------------------------------------------------------------------------------
For these tests...
I have used a very affordable HP LaserJet 1022n (n = networked)/
basic stock black-n-white laser printer.
as for photo paper.. I have success with several brands, sizes & type.. glossy or semi-gloss all types were..
all transfer CLEAN, SOLID lines..vs. using a wax paper or a mailing label backing or similar..
I was very impressed with the quality of transfer using photo paper vs. anything else.
re: etchant.. a few other things to note..
myself. (wrong or right).. I keep my solution in a plastic tub/container.. (with lid)..and just leave it.).. I re-use it.. sometimes adding more or etchant at times..
also adding air/bubbles to the solution helps speed up the process and works well...
my point/goal was to provide a method that doesnt require any special ordering of materials or supplies.. everything should be able to be purchased locally...for cheap!